From Pancake to Sponge Cake: Recreating Kasutera

Figure 1: Cutting into my own kasutera cake for the first time: a modern interpretation of an old recipe.
I absolutely love to bake; from the time I was very little and would help in the kitchen by ‘licking the spoon’ to now, I have accumulated a decent amount of experience with and tacit knowledge of creating sweets. Until recently, however, I had never attempted to bake a recipe straight from a 16th century cookbook. This was definitely a new and exciting challenge.
Project Overview
For my term project, I decided to investigate and replicate Japanese sponge cake, commonly known as kasutera. Composed of mainly sugar, flour, and eggs, kasutera is a fattening, yet delicious, dessert that actually has Spanish and Portuguese origins. The name kasutera itself is actually derived from the Portuguese “Pão de Castela,” meaning “bread from Castille” [1]. It was first introduced to Nagasaki, Japan in the 16th century by Portuguese missionaries who had endured long sailing voyages with kasutera as their hardy, oceanside meal [4]. Nagasaki, which is located on the northwest coast of Kyushu Island, was a highly valued Portuguese trading post. After arriving to this post, it is believed that the Portuguese sailor merchants would provide the leftover cake to Japanese locals, where it soon became a great hit [4]. While the recipe for kasutera is relatively simple, the cake itself was renowned in Japanese households for its stickiness, fluffiness, and sweetness. It is particularly unique due to the crispy, caramelized texture of its bottom crust juxtaposed with its light and airy center. Over the years, the kasutera taste has changed to more suit Japanese palates; the recipe has been adapted to include more indulgent, local ingredients such as starch syrup, sweet red bean paste, green tea, and brown sugar. Creative modifications such as these transformed the cake from merely a European snack into a praised Japanese sweet.


Figure 2: Portuguese traders on a ship, taking tea [3]. Figure 3: Kasutera cake in modern Japan [2].
My goal for this project was twofold: (1) replicate the original Japanese recipe as it was when the Portuguese first introduced it, and (2) bake a newer recipe that reflected certain Japanese adaptations and influences. For guidance, I read chapters of Eric Rath’s book Food and Fantasy in Early Modern Japan which offered historical context of kasutera cake as well as primary source recipes to follow from both the 16th and 18th centuries. The first recipe I followed was taken from the Southern Barbarians’ Cookbook, a collection of 45 sweet and savory short recipes brought by the Spanish and Portuguese people to Japan in the mid-16th century [6]. This recipe is very short, as it was typically shared orally rather than in written form. The second recipe I used came from the cookbook Schema of Famous Japanese Confectionery New and Old, one of the first few published cookbooks on Japanese confectionery ever [6]. This recipe differs from the first by providing a bit more depth and changing ingredient proportions. These authentic recipes, along with the aid of secondary sources that provided me with modern interpretations and instructions, gave me the ability to produce two kasutera cakes with relative accuracy and answer my experimental question: how has Japanese kasutera cake evolved over time?
The Recipes
Below are the original recipes from each cookbook as they appeared in Rath’s text.
Recipe #1
Southern Barbarian’s Cookbook: Early 16th Century
Knead together ten eggs, 160 monme [600 grams] of sugar, and 160 monme of wheat flour. Spread paper in a pot and sprinkle it with flour. Place the dough on top of this. Place a heat source above and below to cook. There are oral instructions.
[8]
Ingredients

Figure 4: Ingredients used for recipe #1.
10 eggs
600 grams of sugar
600 grams of wheat flour
My Modern, Cookbook-Friendly Interpretation of the 16th Century Recipe
First, I will gather and measure my ingredients: 10 eggs, 600 grams of wheat flour, 600 grams of sugar, and a bit of oil.
I will proceed to set the convection oven to 320 degrees Fahrenheit.
Next, I will mix the eggs until they are light and bubbly.
In a separate bowl, I will mix my flour and sugar together, and then sift the mixture with a colander until the dry ingredients are smooth.
I will then slowly beat and knead the flour and sugar into the egg mixture until all is combined.
Afterwards, I will line a pan with parchment paper and sprinkle it with oil and flour. When the ingredients are completely blended together, I will pour the mixture into this pan.
I will then put a lid on top of the pan and put it in the oven for about 60 minutes, or until the cake turns a light brown.
Once the cake is ready, I will remove it from the oven and let it cool for up to an hour.
When it is finally ready to be served, I will slice off the sides of the cake to reveal the vibrant color of its center and then serve the dessert with tea.

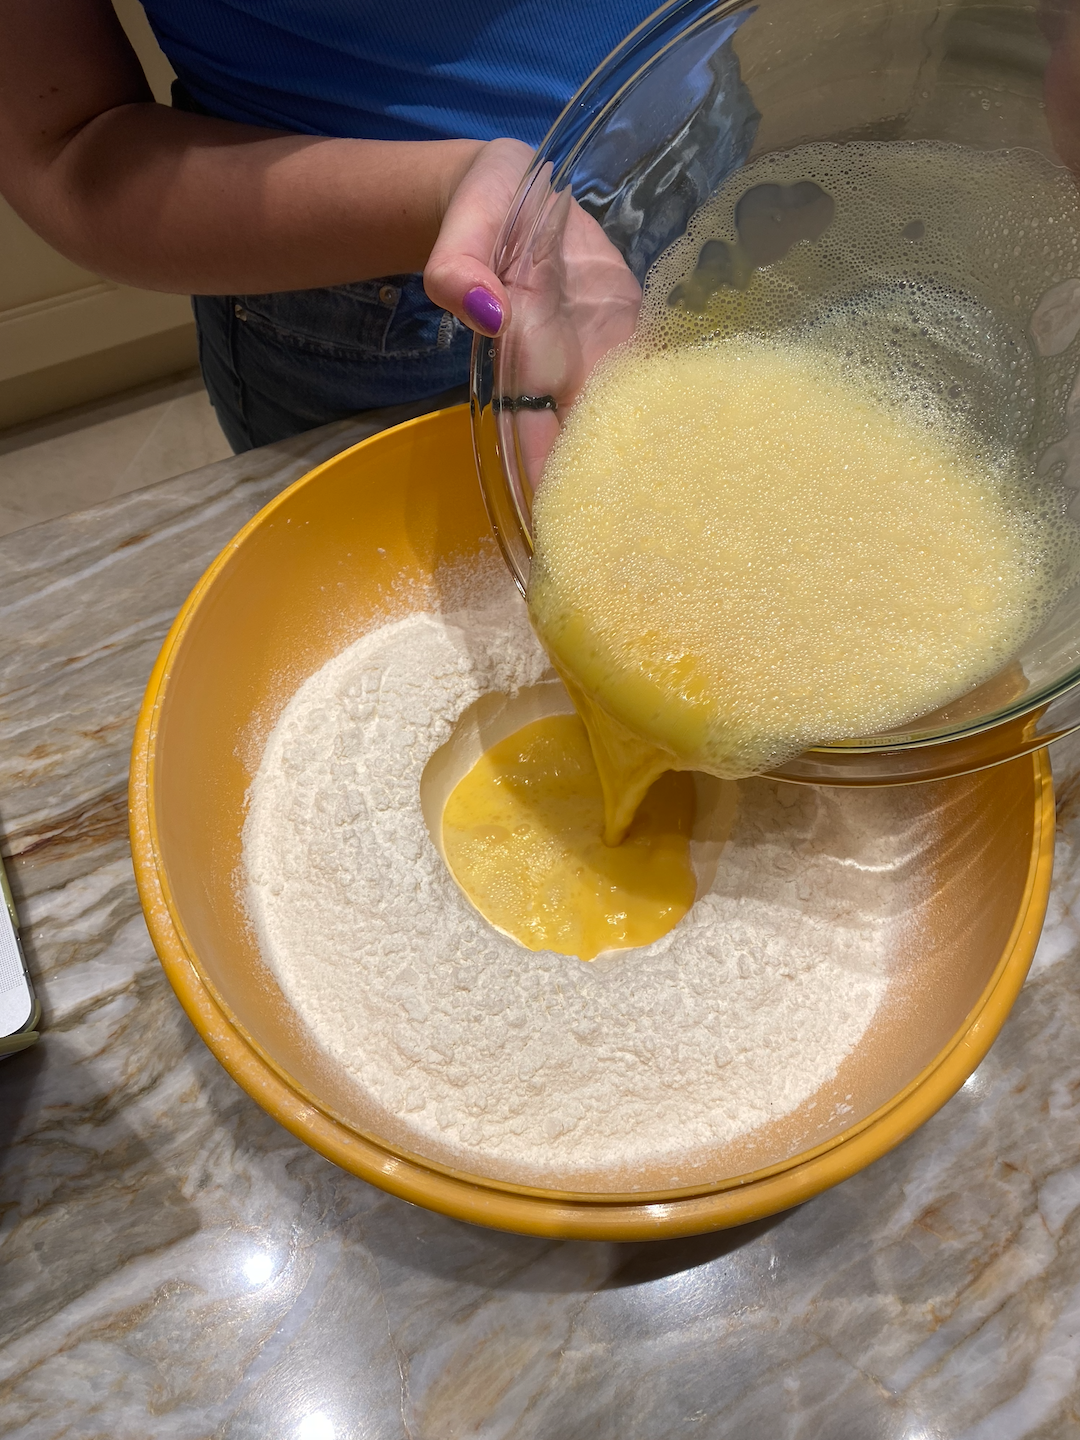


Figures 5-12: Making recipe #1.
Recipe #2
Schema of Famous Japanese Confectionery New and Old: Late 18th Century
In comparison to the recipe in Barbarians’ Cookbook, it uses more eggs, equal to the amount of flour, and more sugar, exceeding the amount of flour:
Break open 100 monme [about 350 grams] of eggs and add these to 100 monme of flour. Mix these in an earthen mortar. Run 115 monme [about 431 grams] of sugar through a bamboo sieve and add, blending well. Make a fire in a charcoal brazier and distribute the heat on the four sides of the brazier. Make a frame from boards inside a cooking pan and place thick paper inside cut into a box shape. Pour the mixture into this. Place over this a paper cover that has been strengthened with persimmon juice, and put over heat. Wait until the heat begins to penetrate the center of the pan and remove the covering paper and replace with a steel lid. On the center of this lid, arrange a fire around the outside of the lid except for the center.
In a short time, when the heat above has burned sufficiently, thekasuteraexpands and rises upward. When it appears to have browned well, pierce it with a piece of thin bamboo here and there to check it. When it is cooked through, it no longer sticks to the bamboo. When you have judged this to have occurred, remove the pan from the heat and let it cool. Remove thekasuteraand cut into portions. In terms of the level of heat, it is better if both the heat on the top and bottom are low. It takes about four hours to make. There is no relation [between the cooking time and] the amount of the ingredients: make them according to the proportions described earlier.
[7]
Ingredients

Figure 13: Ingredients for recipe #2.
350 grams of eggs
350 grams of flour
431 grams of sugar
1 persimmon
My Modern, Cookbook-Friendly Interpretation of the 16th Century Recipe
First, I will gather and measure my ingredients: 350 grams of eggs, 350 grams of flour, 440 grams of sugar, persimmon juice, and a bit of oil.
I will proceed to set the convection oven to 340 degrees Fahrenheit.
Next, I will break open the eggs into the flour and mix until combined.
I will then sift 431 grams of sugar and add it to the flour and egg mixture until all ingredients are well-blended.
Afterwards, I will line a pan with parchment paper and sprinkle it with oil and the remaining sugar. When the ingredients are completely mixed together, I will pour the mixture into this pan.
I will then create juice from a persimmon by squeezing persimmon pulp into a blender and blending it until it turns to liquid.
As soon as the juice is ready, I will coat the pan’s lid and place the cake in the oven for about 15 minutes.
After 20 minutes, I will remove the persimmon-coated lid and replace with a regular lid, set the temperature in the convention oven down to 320 degrees Fahrenheit, and put the mixture back in the oven for another 60 minutes or until the cake turns a light brown.
I will check if the cake is ready by piercing it with a toothpick; if the cake sticks to the toothpick, keep it in the oven for longer.
Once the cake is ready, I will remove it from the oven and let it cool for up to an hour.
When it is finally ready to be served, I will slice off the sides of the cake to reveal the vibrant color of its center and then serve the dessert with tea.


Figures 14-21: Making recipe #2.
Secondary Sources
To supplement these primary source recipes, I relied on modern kasutera cake recipes to fill the gaps in my knowledge. Particularly, I considered modern recipes’ pan size, parchment paper usage, oven temperature, and time in the oven when developing my own process—these details were missing from the original recipes. By reading modern Japanese food blogs and watching culinary tutorials, I was able to stay somewhat authentic to the original cakes. Below is one example of modern kasutera cake that aided me in my own baking process:
[2]
Process
As I was reading these old recipes and getting organized to bake my own kasutera, the ingredients really stood out to me: eggs, sugar, wheat flour, and persimmon juice. No leavening agents! I was very concerned that these cakes would not rise, and subsequently would not taste very good. Upon further research and reflection, however, I learned that these so-called ‘cakes’ were actually initially more like pancakes than the fluffy dessert we know, today [6]. Additionally, wheat flour, in particular, drew my attention. I have heard of all-purpose flour, whole wheat flour, bread flour, and even cake flour, but never just wheat flour. Drawing upon my tacit culinary knowledge, I knew that this kasutera wheat flour could not possibly be the same as the whole wheat flour I use to make hardy breads and pasta. To solve this mystery, I ventured over to my local Asian supermarket where I conducted live research and found Daehan wheat flour, a famous, powdery Korean all-purpose flour with a high protein content. Without my prior knowledge of baking in the kitchen, I most definitely would have used American whole wheat flour and the cakes would have tasted more like bread than a sweet! It is also important to note that the Asian market did not sell persimmon juice, so I decided to simply buy a persimmon and squeeze it to make my own juice, instead.
Once I gathered all of my ingredients, I felt that it was necessary to create a game-plan by interpreting these older recipes and writing down my own modern, cookbook-friendly instructions. While some parts of the recipes were easy to interpret, others were quite confusing. I needed to mitigate issues of authenticity, so as I was considering what the baking process would eventually look like, I attempted to answer the following questions:
Do I use a pan or a pot?
How should I bake the cakes?
How long should I bake the cakes?
What does it mean for a cover to be “strengthened with persimmon juice”?
What are the “oral instructions”?
Since I was baking these cakes in my grandparents’ kitchen (versus the dorm kitchen where I cooked the imitation crab recipe), I had much greater access to both ingredients and materials. After doing some digging in the very back of their kitchen cabinets, I was lucky enough to find an oven-safe copper pan with a lid that perfectly matched Rath’s description of the kasutera baking pan on page 98 [6]. I decided that this was going to be the vehicle for holding my kasutera, and yet I still needed more instructions for how to actually bake the cakes.
The instructions for kasutera cake in Barbarians’ Cookbook call for “putting a flame above and below” [6]. It is evident here that the recipe was established long before ovens even existed. Although I could have attempted to emulate the 16th century baking process of placing a pot of cake batter in between two large, flaming fires, I decided that would not be the safest option [6]. Instead, I figured a convection oven, which constantly circulates air throughout the entire cavity, would also do the trick. I turned to modern recipes for more information on temperature and cook time, and decided on 320 degrees Fahrenheit for 60 minutes for cake #1, and 340 degrees Fahrenheit for 20 minutes and 320 degrees Fahrenheit for 60 minutes for cake #2. Since these numbers were relatively arbitrary when I came up with them, both cakes did end up needing a longer cook time.
Furthermore, the kasutera recipe in Schema of Famous Japanese Confectionery New and Old specifically called for persimmon juice to be placed over the cake as it began to heat up, perhaps to add a sweet flavor to the rather bland cake. Since I could not find persimmon juice, I knew that I would need to make my own by scooping out the pulp and blending it in a blender until a juice formed. Following both the original kasutera recipe and a modern one, I decided to then put this juice on the lid of my cake for about 20 minutes, remove and clean the lid, and then place the clean lid back on the cake to bake for another 60 minutes or until the cake turned brown. In retrospect, I probably should have put the juice on parchment paper and placed it directly over my cake, rather than coating the lid; this would have had a greater impact on the flavor of my cake overall.
My last question related to the ending of the first recipe: “there are oral instructions” [6]. In this course, we spent a lot of time discussing the important process of learning, specializing, and mastering a craft. We came to understand that these craft instructions typically produce the best product when they are taught by master artisans, themselves. It makes me wonder how my cake would have turned out had I learned properly from the hands of an experienced kasutera baker—would I have baked the cake in a pot, over a burning flame? Would I have baked the dough for longer? Shorter? These are questions that we may never learn the answer to. In the meantime, I am happy with my original kasutera attempts.
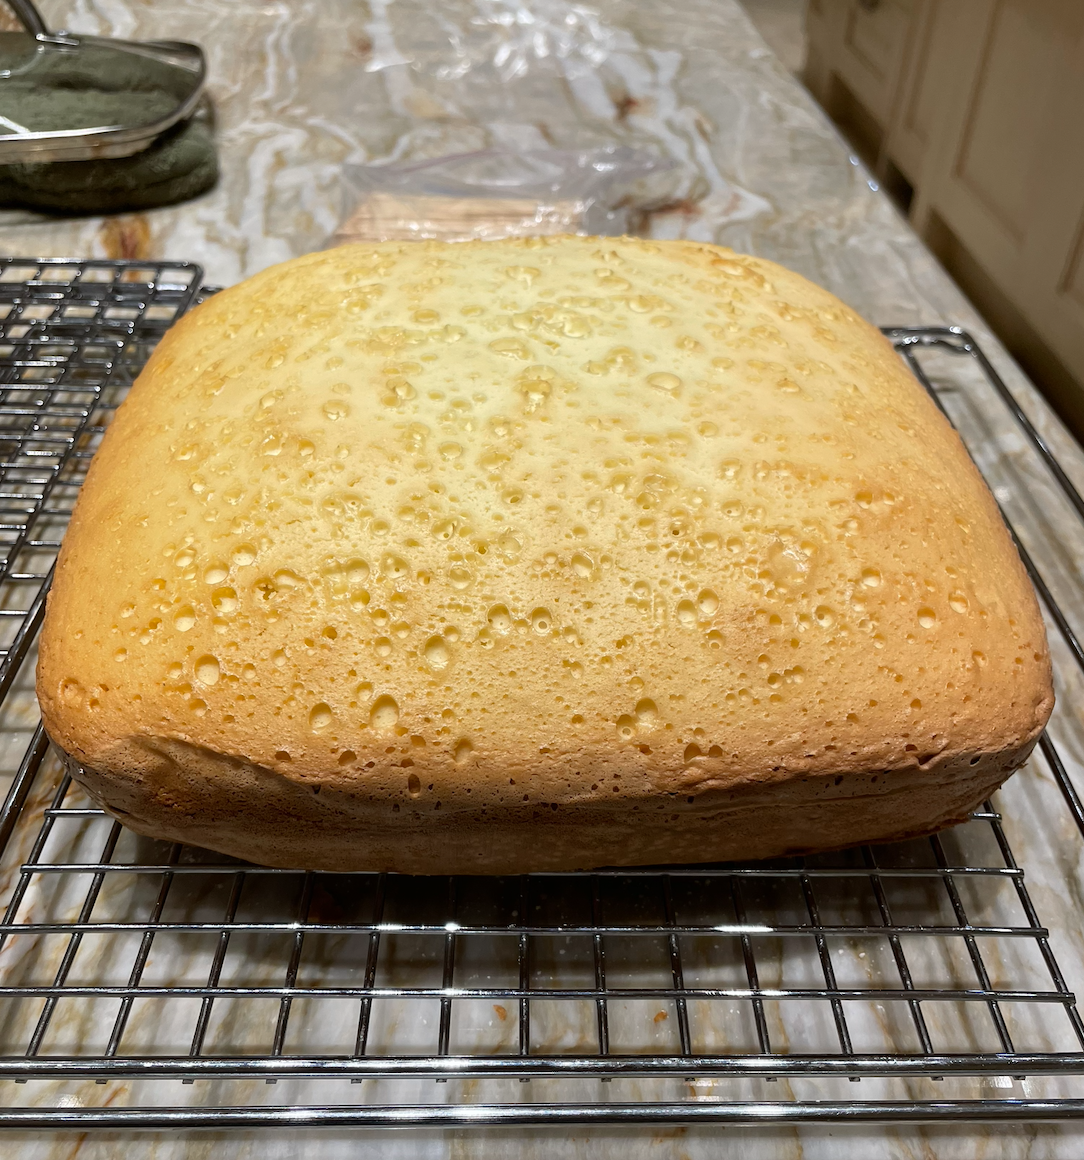
Final Products
Overall, I was happily surprised with how my kasutera cakes turned out. I definitely felt overwhelmed when I first started, but after compiling and evaluating my primary and secondary sources, I was able to produce two successful final products. There was a definitive difference between the two cakes; the first was denser, flatter, and weighed about 10 pounds, while the other was light and fluffy. Both tasted delicious and sweet, but mainly varied in texture. I imagine that as the dish evolved from a Portuguese sailors’ snack meant to last an entire voyage to a renowned Japanese household dessert, these changes were implemented to match the scenario in which the cake was being consumed. I ended up serving both of my cakes with tea, as instructed, and the desserts melted in my mouth [6]. My family members mutually agreed that the second recipe ranked supreme. I call this a success!


Figures 22-25: Final cake products.
Works Cited
[1] Chen, Namiko. 2013. Castella Cake. September 14. https://www.justonecookbook.com/castella/.
[2] 2013. How to Make Castella (Recipe). YouTube. Directed by Just One Cookbook. Performed by Namiko Chen.
[3] Ewbank, Anne. 2018. Inside a 17th-Century ‘Barbarian’ Cookbook From Japan. September 11. https://www.atlasobscura.com/articles/portuguese-japanese-cookbook.
[4] Foodicles. 2021. Japanese Castella History: From Portugal to Japan. July 6. https://foodicles.com/japanese-castella-history/.
[5] Nusselder, Joost. 2021. What Is Flour In Japanese? All the Different Names Explained. August 25. https://www.bitemybun.com/what-is-flour-in-japanese/#Is_wheat_flour_available_in_Japan.
[6] Rath, Eric C. 2010. Food and Fantasy in Early Modern Japan. Los Angeles: University of California Press.
[7] 1761. Schema of Famous Japanese Confectionery New and Old. Kyoto.
[8] n.d. Southern Barbarians' Cookbook.
[9] Taste Atlas. n.d. Authentic Kasutera Recipe. https://www.tasteatlas.com/kasutera/recipe.
[10] Tsukamoto, Miho. 2018. Transformation of Tradition and Culture. Vol. 1. XLIBRIS.